INGenious Plugin System
Plugins let you extend the INGenious Playwright Framework with custom automation actions, new object types, and integrations—across browser automation, database, mobile, web services, or other testing domains. The plugin system is designed for flexibility and isolation, so you can safely add new features or connect external systems without modifying the core framework.
Plugin Structure
The INGenious plugin system is designed for flexibility, version safety, and easy integration.
Key points:
- API Module (
ingenious-api): Provides stable interfaces between framework and plugins - Core libraries from main app: All essential libraries are always supplied by the main application, so everything stays in sync.
- Each plugin can use its own library versions: Plugins are set up so they don’t share their extra libraries with each other. This means you can use different versions of the same library in different plugins, and they won’t interfere or cause conflicts.
With this approach, you can build plugins independently, knowing they’ll remain compatible with the framework and won’t conflict with other plugins.
Plugin Directory Structure
Your plugins should be organized in the following directory structure:
Each plugin resides in its own subfolder under plugins, containing the plugin JAR and a lib directory for its dependencies.
Supported Test Domains
- General Purpose Plugin
- Browser Plugin
- Database Plugin
- Mobile Plugin
- Webservice Plugin
Other tests domains (queue, kafka and etc) will be supported in the upcoming releases.
Features
INGenious Object Types and Actions
Object types in INGenious categorize automation actions, helping organize and group related functionalities within the platform. Actions are the operations or commands you define for each object type.
Adding Actions to Existing Object Types
You can extend the functionality of any existing object type by adding new actions to it in your plugin. This lets you group related operations under the same object type, making them available in the INGenious UI alongside built-in and other custom actions.
To add a new action to an existing object type, simply use the same object type name in the @Action annotation of your method. For example, to add a new assertion to the "General" object type:
@Action(object = "General", desc = "Assert if input is a positive number", input = InputType.YES, condition = InputType.NO)
public void assertPositiveNumber() {
    String var = getVar(Input);
    int number = Integer.parseInt(var);
    if (number > 0) {
        Report.updateTestLog(Action, "The input " + Data + " is a positive number.", Status.PASSNS);
    } else {
        Report.updateTestLog(Action, "The input " + Data + " is not a positive number.", Status.FAILNS);
    }
}
You can add as many actions as you need under the same object type, as long as each action method name is unique within your plugin. These actions will appear together in the UI under the specified object type.
Adding New Object Type
By creating plugins, you can introduce new object types and their associated actions, making them available in the INGenious UI alongside built-in types. This extensibility allows you to tailor the automation framework to your specific testing needs.
Multiple new object types can also be added in a single entry class. Ensure object types and actions are defined inside your entry classes - otherwise they will not be detected by INGenious.
Object type names are case sensitive (e.g., xml and XML are treated as different types).
To add new Object Type, declare it inside the @Action annotation as the object. See example below.
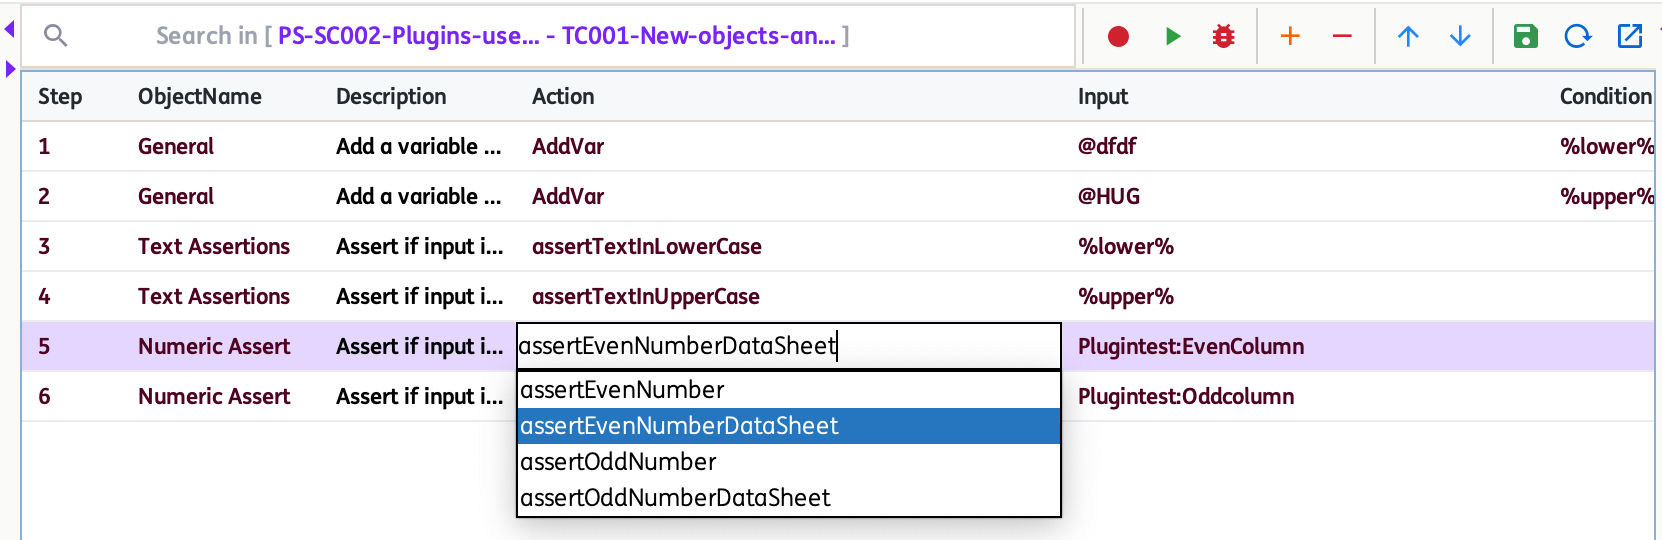
@Action(object = "Numeric Assert", desc = "Assert if input is even number", input = InputType.YES, condition = InputType.NO)
    public void assertEvenNumber(){
        String var = getVar(Input);
        System.out.println("Input is " + var);
        int number = Integer.parseInt(var);
        if(number % 2 != 0){
            Report.updateTestLog(Action, "The input " + Data + " is not an even number.", Status.FAILNS);
        } else {
            Report.updateTestLog(Action, "The input " + Data + " is an even number.", Status.PASSNS);
        }
    }
Below is how it should appear in the INGenious Playwright Studio IDE.
Dependency Isolation
Each plugin runs in its own isolated classloader:
- Different plugins can use different versions of the same library without conflicts
- Plugin dependencies don't affect the core framework or other plugins
- Critical packages (such as
ingenious-api,playwright, and other core libraries) are always provided by the main application and loaded from the parent classloader, not from your plugin's dependencies. This ensures version consistency and prevents class conflicts.
How to Create Your Plugin
Follow these steps to build and deploy a custom plugin for the INGenious Playwright Framework:
-
Set Up Your Maven Project
Create a generic Maven Java project (no main class required).
Configure Java Version - The framework runs on Java 17, but plugins can run on version that your machine supports:
<properties>
    <!-- REQUIRED: Match framework Java version -->
    <maven.compiler.source>17</maven.compiler.source>
    <maven.compiler.target>17</maven.compiler.target>
</properties>
Add Required Dependencies - In your
pom.xml:<dependencies> <!-- REQUIRED: API module with provided scope --> <dependency> <groupId>com.ing</groupId> <artifactId>ingenious-api</artifactId> <version>3.0</version> <scope>provided</scope> </dependency> <!-- REQUIRED if working with Browser: Playwright with provided scope --> <dependency> <groupId>com.microsoft.playwright</groupId> <artifactId>playwright</artifactId> <version>1.50.0</version> <scope>provided</scope> </dependency> <!-- Optional: Add your plugin-specific dependencies here --> </dependencies>Both dependencies MUST use
<scope>provided</scope>. This tells Maven not to bundle these libraries in your plugin JAR, as they will be provided by the framework. This prevents conflicts and keeps your plugin JAR small.Playwright dependency is only required when your plugin is working with playwright.
-
Configure Dependency Packaging
If your plugin has additional dependencies (beyond
ingenious-apiandplaywright), configure the Maven Dependency Plugin to copy them to thelibfolder:<plugin> <groupId>org.apache.maven.plugins</groupId> <artifactId>maven-dependency-plugin</artifactId> <version>3.6.0</version> <executions> <execution> <id>copy-dependencies</id> <phase>package</phase> <goals> <goal>copy-dependencies</goal> </goals> <configuration> <outputDirectory>${project.build.directory}/lib</outputDirectory> <excludeScope>provided</excludeScope> <excludeTransitive>true</excludeTransitive> </configuration> </execution> </executions> </plugin>Since
ingenious-apiandplaywrightuseprovidedscope, they are automatically excluded from thelibfolder. Other dependencies will be copied. -
Declare Plugin Entry Classes
Entry classes contain your action methods and are dynamically instantiated by INGenious. Specify them in the JAR manifest using the Maven JAR plugin:
<plugin>
    <groupId>org.apache.maven.plugins</groupId>
    <artifactId>maven-jar-plugin</artifactId>
    <version>3.3.0</version>
    <configuration>
        <archive>
            <manifestEntries>
                <pluginEntryClasses>
                    com.example.plugin.BrowserActions,com.example.plugin.CustomActions
                </pluginEntryClasses>
                <Implementation-Version>${project.version}</Implementation-Version>
            </manifestEntries>
        </archive>
    </configuration>
</plugin>
List fully qualified class names (Package.ClassName), separated by commas.
-
Automate Deployment
To automatically copy your JAR and dependencies to the plugin directory, use the Maven Antrun plugin. Update
deploy.dirto your target plugin folder:<plugin> <groupId>org.apache.maven.plugins</groupId> <artifactId>maven-antrun-plugin</artifactId> <version>3.1.0</version> <executions> <execution> <id>copy-artifacts</id> <phase>package</phase> <configuration> <target> <!-- Destination directory --> <property name="deploy.dir" value="/path/to/INGenious"/> <!-- Copy and rename JAR --> <copy file="${project.build.directory}/${project.build.finalName}.jar" tofile="${deploy.dir}/plugins/${project.artifactId}/${project.artifactId}.jar"/> <!-- Copy lib folder only if it exists --> <mkdir dir="${deploy.dir}/plugins/${project.artifactId}/lib"/> <copy todir="${deploy.dir}/plugins/${project.artifactId}/lib"> <fileset dir="${project.build.directory}/lib"/> </copy> </target> </configuration> <goals> <goal>run</goal> </goals> </execution> </executions> </plugin> -
Implement Entry Classes
Create your entry class(es) with action methods. Entry classes receive the contract interface (such as
GeneralBrApiorGeneralDbApi) via constructor injection. All framework functionalities are accessed through this contract instance, which is provided to your entry class by the framework at runtime.Basic Plugin Example:
package com.ing.plugin.browser; import com.ing.ingenious.api.annotation.Action; import com.ing.ingenious.api.contract.BrowserPluginApi; import com.ing.ingenious.api.contract.data.UserDataAccessApi; import com.ing.ingenious.api.contract.reports.TestCaseReportApi; import com.ing.ingenious.api.exception.ForcedException; import com.ing.ingenious.api.types.ObjectType; import com.ing.ingenious.api.types.InputType; import com.ing.ingenious.api.status.Status; import com.microsoft.playwright.Page; import com.microsoft.playwright.Page.NavigateOptions; import com.microsoft.playwright.TimeoutError; import com.microsoft.playwright.Locator; import java.util.logging.Level; import java.util.logging.Logger; import org.apache.commons.lang3.StringUtils; public class BrowserTestPlugin { BrowserPluginApi gen; public String Data; public String Action; public String Input; public String Condition; public TestCaseReportApi Report; public UserDataAccessApi UserData; public String ObjectName; // Playwright objects public Page Page; public Locator Locator; public BrowserTestPlugin(BrowserPluginApi gen) { System.out.println("BrowserTestPlugin initialized with GeneralBrApi: " + gen); this.gen = gen; this.Data = gen.getData(); this.Action = gen.getAction(); this.Input = gen.getInput(); this.Condition = gen.getCondition(); this.Report = gen.getReport(); this.UserData = gen.getUserData(); this.ObjectName = gen.getObjectName(); this.Page = (Page) gen.getPage(); this.Locator = (Locator) gen.getLocator(); } @Action(object = ObjectType.BROWSER, desc = "Open the Url [<Data>] in the Browser", input = InputType.YES, condition = InputType.OPTIONAL) public void Open_PluginVersion() { Boolean pageTimeOut = false; NavigateOptions navigateOptions = new NavigateOptions(); try { if (Condition.matches("[0-9]+")) { navigateOptions.setTimeout(Double.parseDouble(Condition)); } Page.navigate(Data, navigateOptions); Report.updateTestLog("Open", "Opened Url: " + Data, Status.DONE); } catch (TimeoutError e) { Report.updateTestLog("Open", "Opened Url: " + Data + " and cancelled page load after " + Condition + " seconds", Status.DONE); } catch (Exception e) { Logger.getLogger(this.getClass().getName()).log(Level.OFF, null, e); Report.updateTestLog("Open", e.getMessage(), Status.FAIL); throw new ForcedException("Open", e.getMessage()); } if (pageTimeOut) { setPageTimeOut(300); } } private double getTimeoutValue() { double timeout = 5000; if (StringUtils.isNotBlank(Condition)) { try { timeout = Double.parseDouble(Condition.trim()); } catch (NumberFormatException e) { Report.updateTestLog(Action, "'" + Condition + "' cannot be converted to timeout of type Double", Status.DEBUG); } } return timeout; } private void setPageTimeOut(double sec) { try { Page.setDefaultNavigationTimeout(sec); } catch (Exception ex) { System.out.println("Couldn't set PageTimeOut to " + sec); } } } -
Build and Deploy
Run the following Maven command:
Your plugin JAR and
libfolder will be copied to the INGenious plugin directory. -
Use Your Plugin
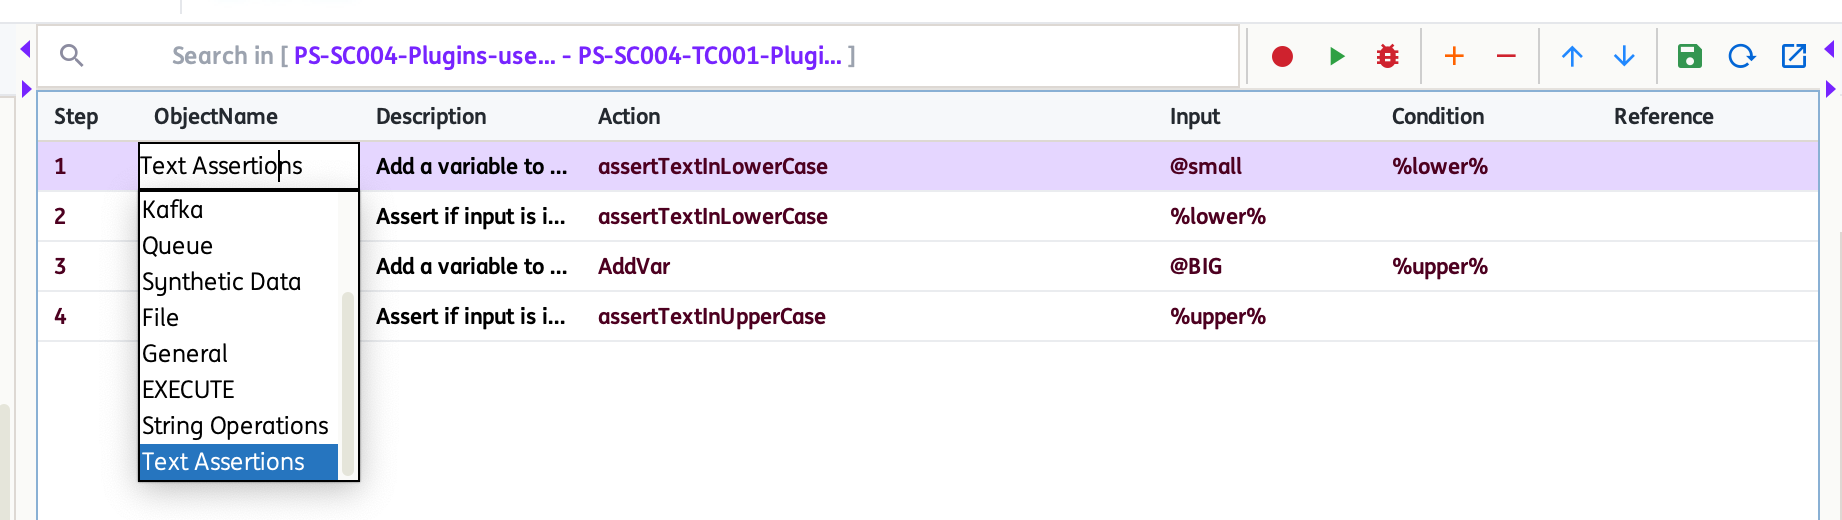
Launch INGenious Playwright Studio. Your plugin’s object types and actions will appear in the autosuggest dropdowns for their corresponding columns in the UI.
Refer to Plugin Templates for more complete templates.
Working with Playwright Objects
The framework provides access to Playwright objects (Page, Locator, BrowserContext, etc.) through the GeneralBrApi interface. To keep plugins flexible and independent from the main framework, Playwright objects (like Page or Locator) are given to your plugin as generic Objects. This means your plugin isn’t tightly connected to a specific version of Playwright or the framework. When you want to use these as Playwright types, just cast them back to the right type in your code—for example, (Page) gen.getPage(). This keeps your plugin compatible and easy to maintain.
Accessing Playwright Objects
Refer to the BrowserTestPlugin example in Step 5 above for a complete, working implementation.
Key points demonstrated in that example:
-
Constructor Pattern: Accept
BrowserPluginApias a constructor parameter -
Cast Once in Constructor: Get Playwright objects from the API and store them as typed fields
-
Use in Action Methods: Use the typed fields directly with full Playwright API
Same will logic applies to the appium objects for mobile testing. See Mobile Template
Best Practices
-
Cast-Once in Constructor Pattern** (as shown in BrowserTestPlugin):
// ✅ Best Practice - Cast once in constructor, use everywhere public BrowserTestPlugin(BrowserPluginApi gen) { this.Page = (Page) gen.getPage(); // Cast once this.Locator = (Locator) gen.getLocator(); // Cast once } @Action(...) public void someAction() { Page.navigate(Data); // Use typed field with autocomplete } -
Null Checking for Safety**:
-
Error Handling** (as shown in BrowserTestPlugin OpenTest method):
Best Practice
Object Naming
- Use descriptive nouns that clearly represent the testing domain concept (e.g.,
Webservice,Database). - Objects can also represent items that have associated actions, such as
XMLDocumentfor XML-related operations (e.g., create XML document, add child nodes). - Avoid abbreviations unless they are widely recognized (e.g., Api, Id).
Storage Action Naming
- Use format
store<Data>In<TargetDestination>(e.g.,storeDBValueInDataSheet,storeResultInVariable,storeValueInGlobalVariable).
Assert Action Naming
- Use format
assert<ObjectOfAssertion><Condition>(e.g.,assertResponseBodyContains,assertXMLElementEquals).