Working with Kafka
How to create a Kafka - based Test Case?
Kafka testing in INGenious lets you produce messages to a topic and consume/validate messages from a topic as part of a test case. This page is structured to walk through that setup for both the current and legacy approach: the v4.0.0 and up tab covers the named-configuration model (aliases referenced via #alias), while the Prior to v4.0.0 tab covers the earlier per-step configuration model.
4.0.0
Kafka connectivity is defined once per named configuration — not per test step — and referenced
from a step using the #alias syntax. See Kafka Configurations below.
1. Configure the aliases
- Create a Producer and a Consumer alias under Settings Kafka Configurations.
2. Produce a message
-
Create the
message. You can leverage built-in capabilities in INGenious likeSynthetic Data Generationto createUUIDs and other data to be fed into the message. -
Use the
produceMessageaction, which comes with an editor that makes parameterization of data in the payload very easy. This action is always marked in Green. [See the section below]. Put the producer alias (e.g.#OrdersProducer) in the Condition column. -
Use the
sendKafkaMessageaction to push the message to the producer topic.
3. Consume a message
-
Use the
identifyTargetMessageaction to consume a specific target message, and provide a unique value along with its corresponding JSON Path or X-Path. -
Use
consumeKafkaMessagewith the consumer alias (e.g.#OrdersConsumer) in the Condition column, and validate/store message details, specific tags or even the entire message body. -
Always finish with
closeConsumerto release consumer state and resources, even on assertion failure paths.
Minimal produce flow
| ObjectName | Action | Input | Condition |
|---|---|---|---|
| Kafka |  produceMessage |
{Sheet:Column} or literal payload |
#OrdersProducer |
| Kafka | sendKafkaMessage |
— | #OrdersProducer |
Minimal consume flow
| ObjectName | Action | Input | Condition |
|---|---|---|---|
| Kafka | identifyTargetMessage |
expected value, e.g. 12345 |
$.orderId (repeatable) |
| Kafka | consumeKafkaMessage |
— | #OrdersConsumer |
| Kafka | closeConsumer |
— | — |
Per-step overrides
The legacy setXxx actions still work and take precedence over the named config for that
key/step — use them only when you need a one-off override (for example setPartition,
setKey, setTimeStamp, addKafkaHeader, addSchema, setConsumerGroupId).
Legacy actions
These legacy setXxx actions are highlighted in Orange in the grid.
It is advisable to move to Kafka Configurations going forward instead of relying on these
per-step overrides.
Tip
If the alias in the Condition column doesn't exist, the default configuration is used instead.
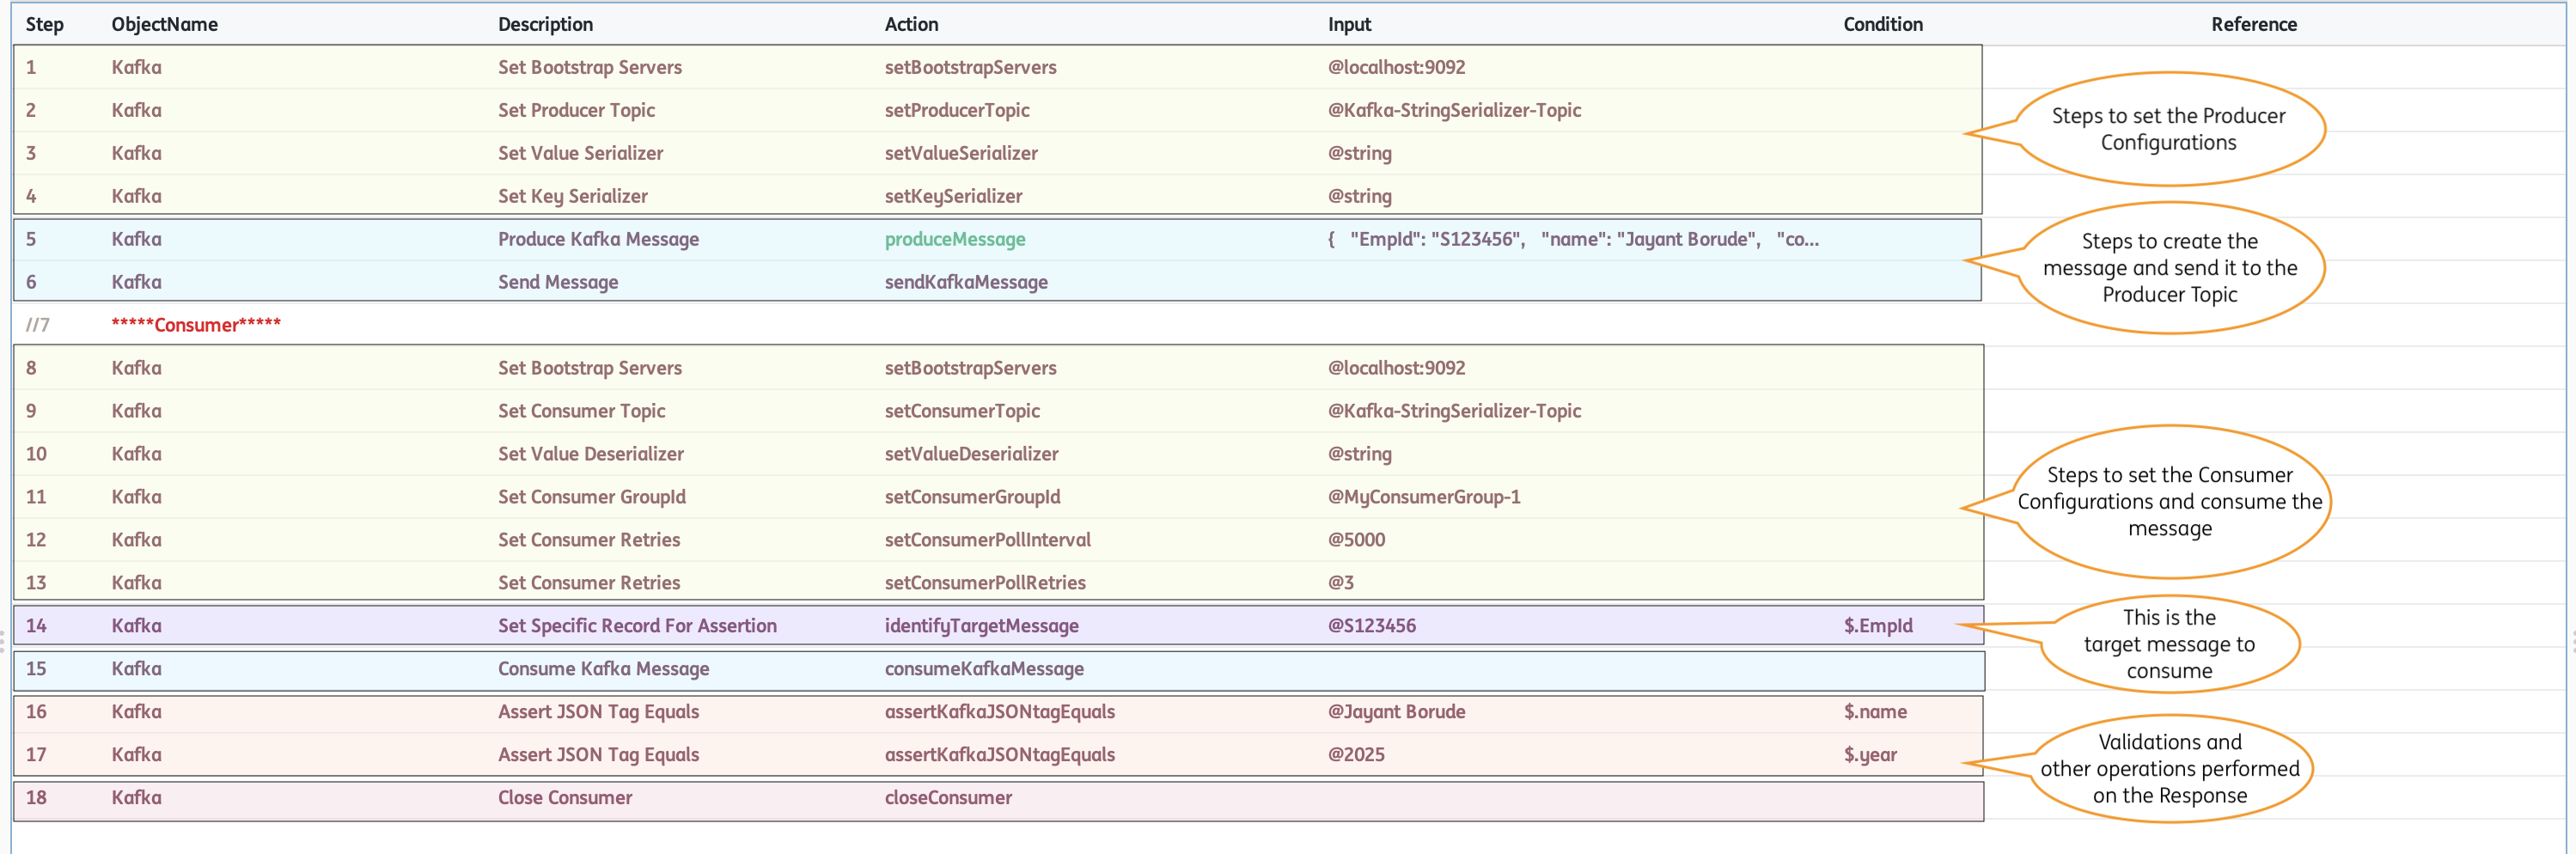
For String Serializer, the following are required: bootstrap.servers, producer.topic, value.serializer, key.serializer
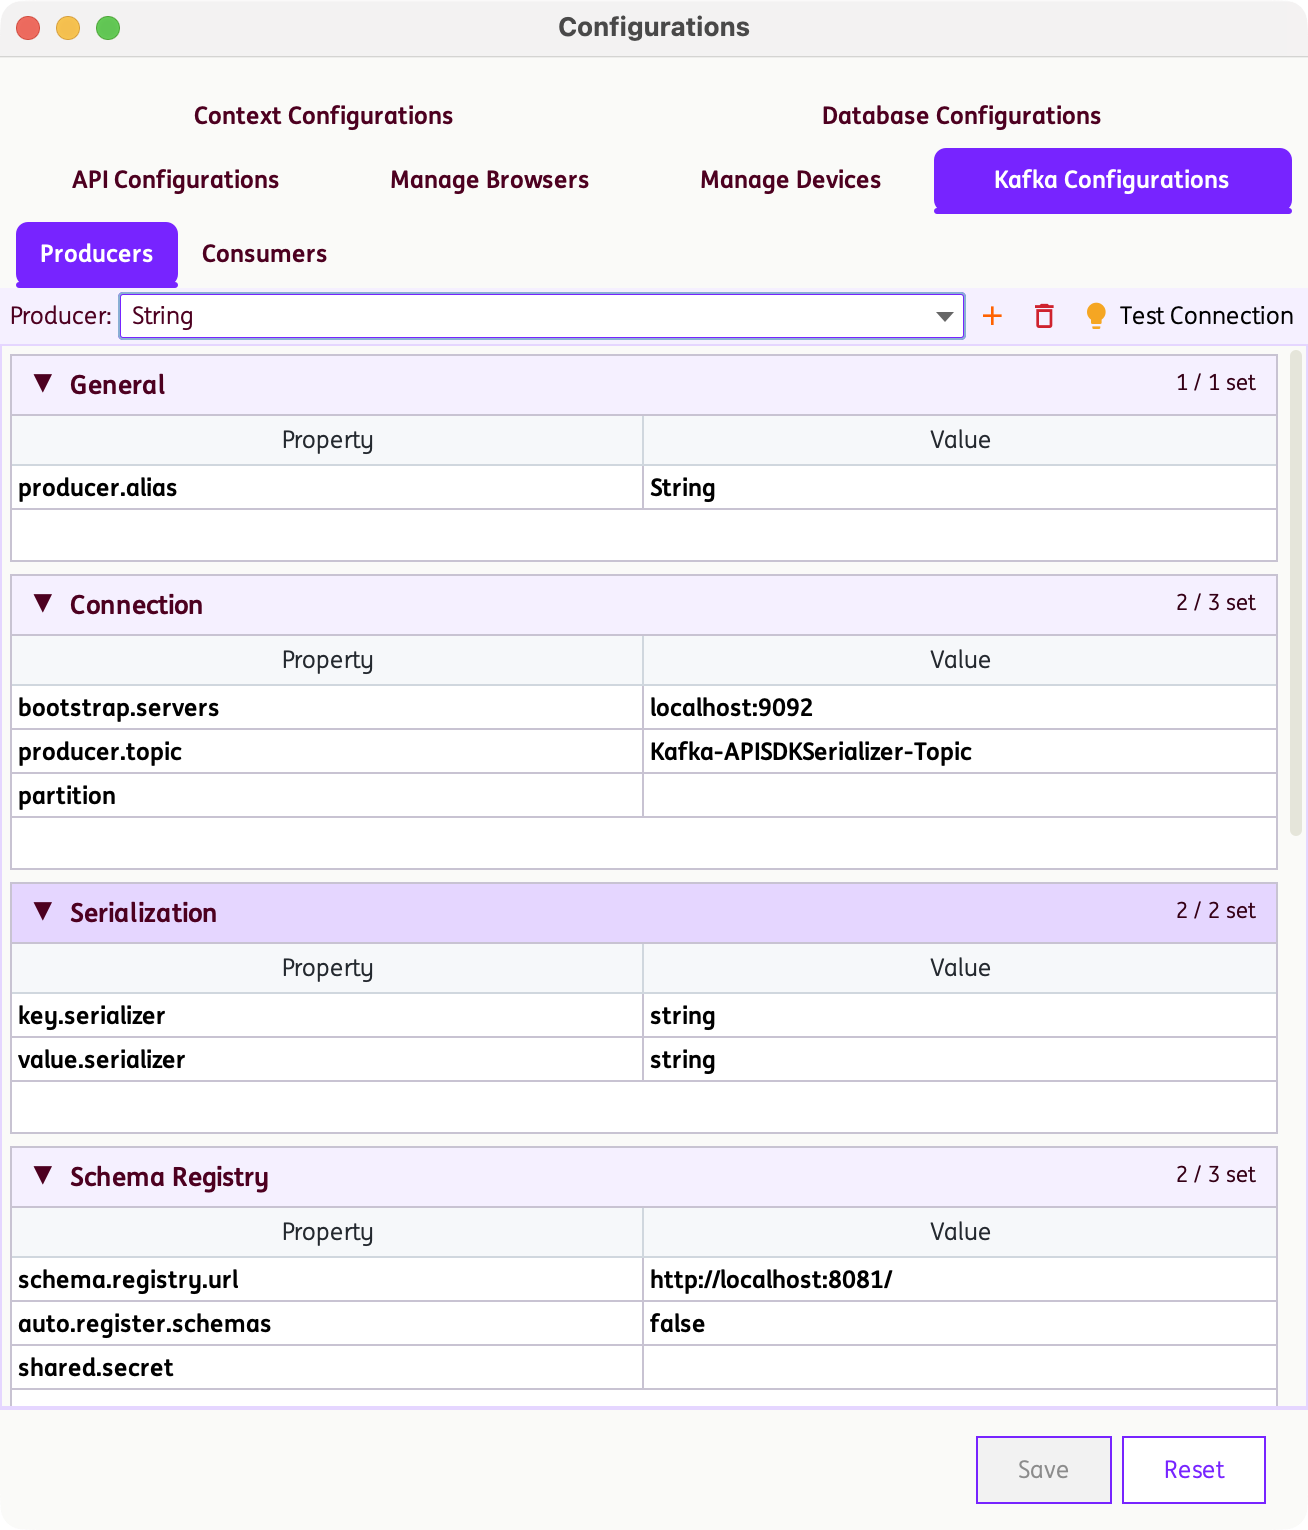
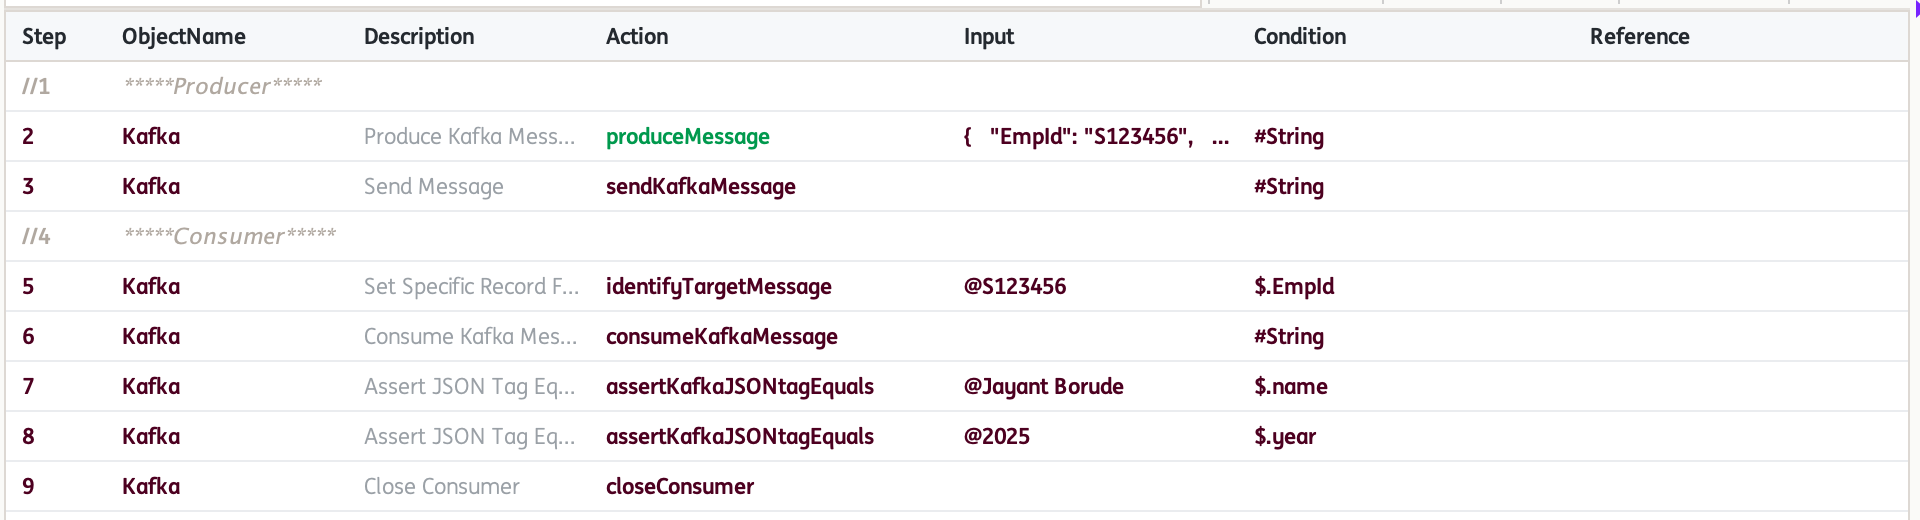
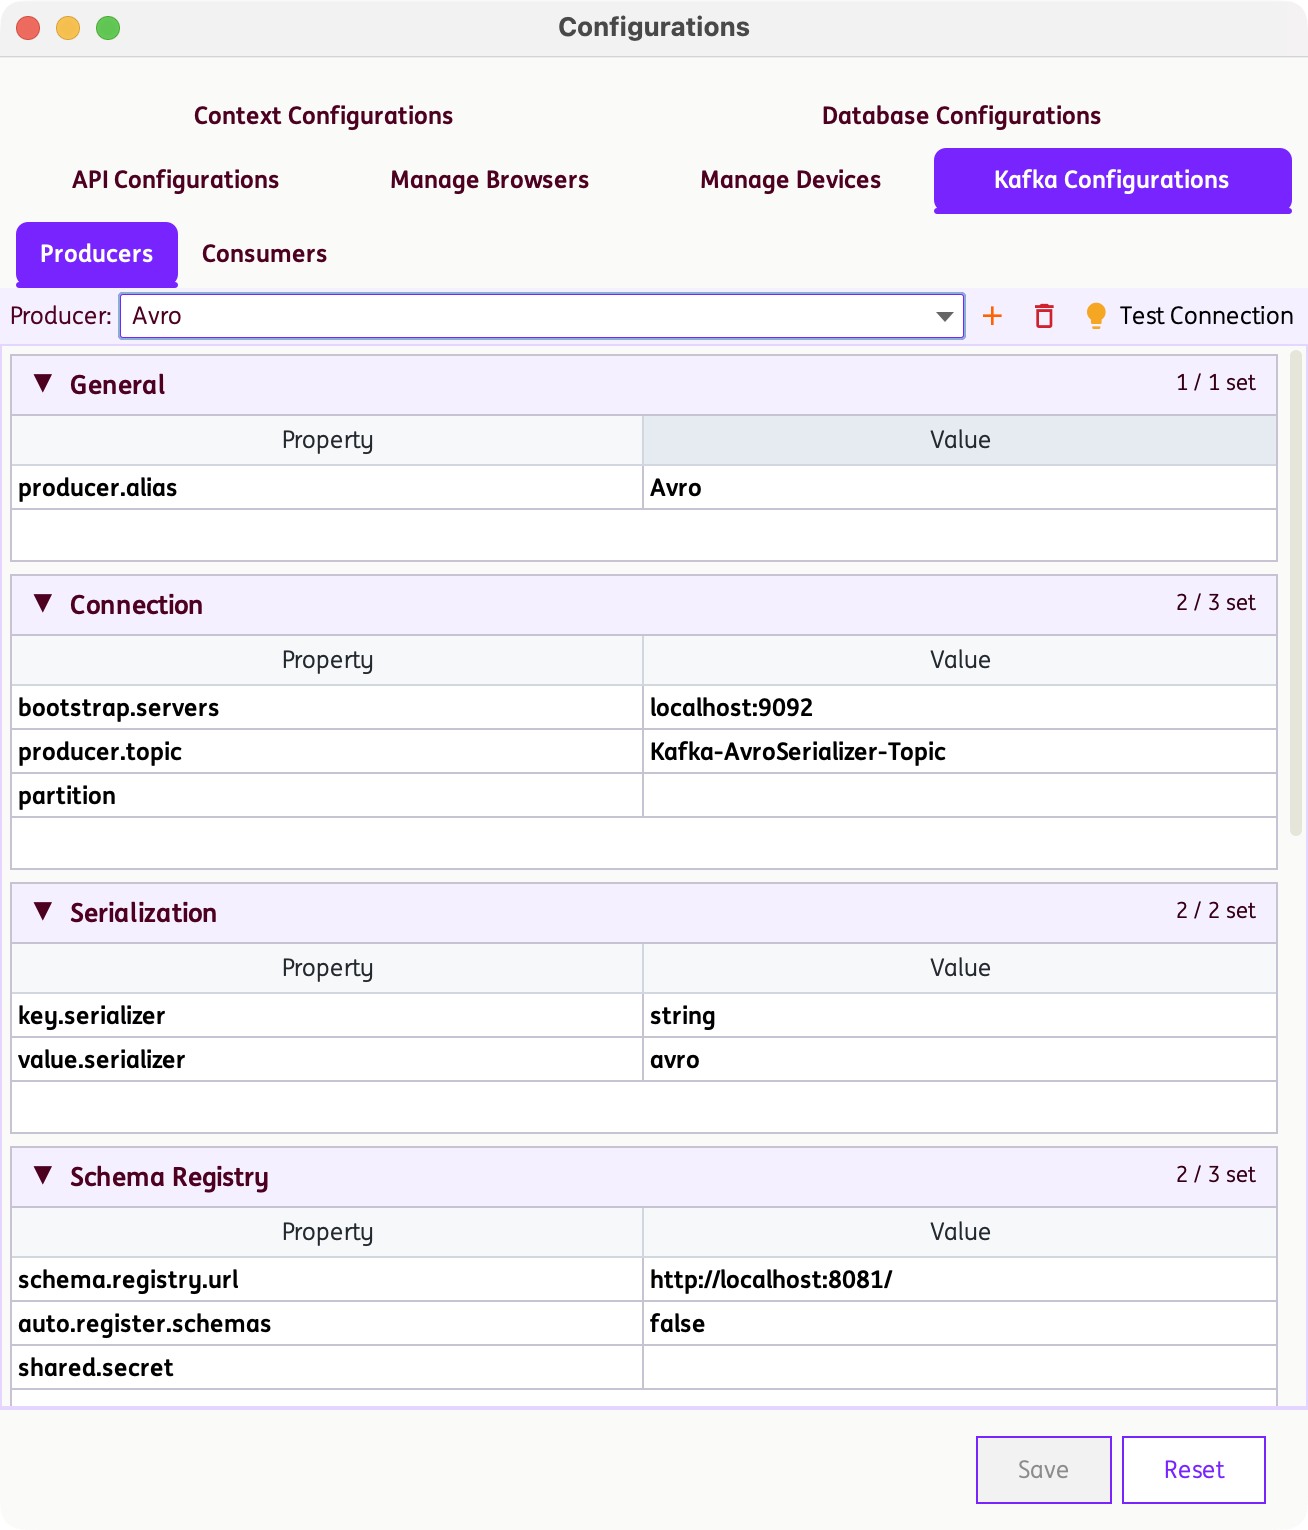
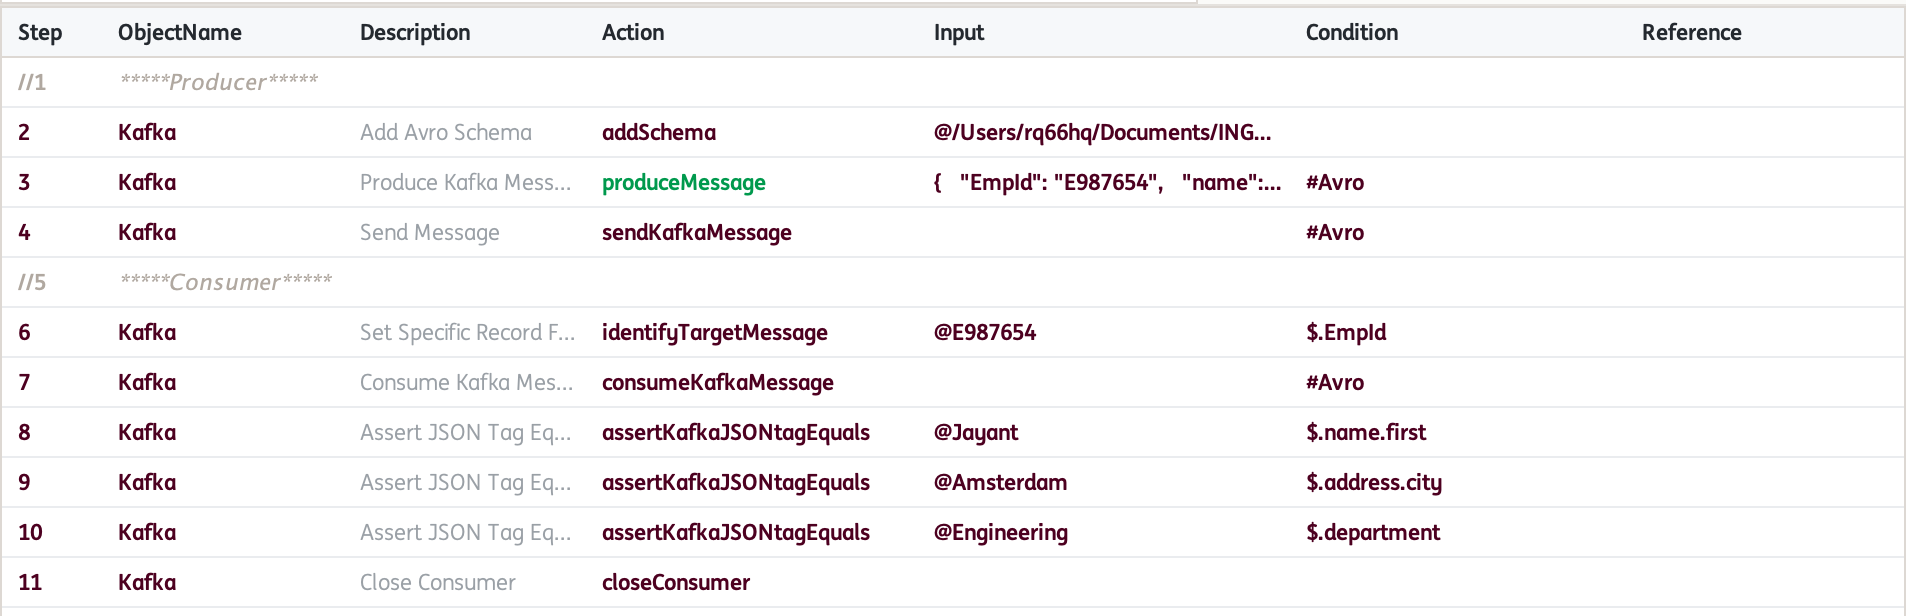
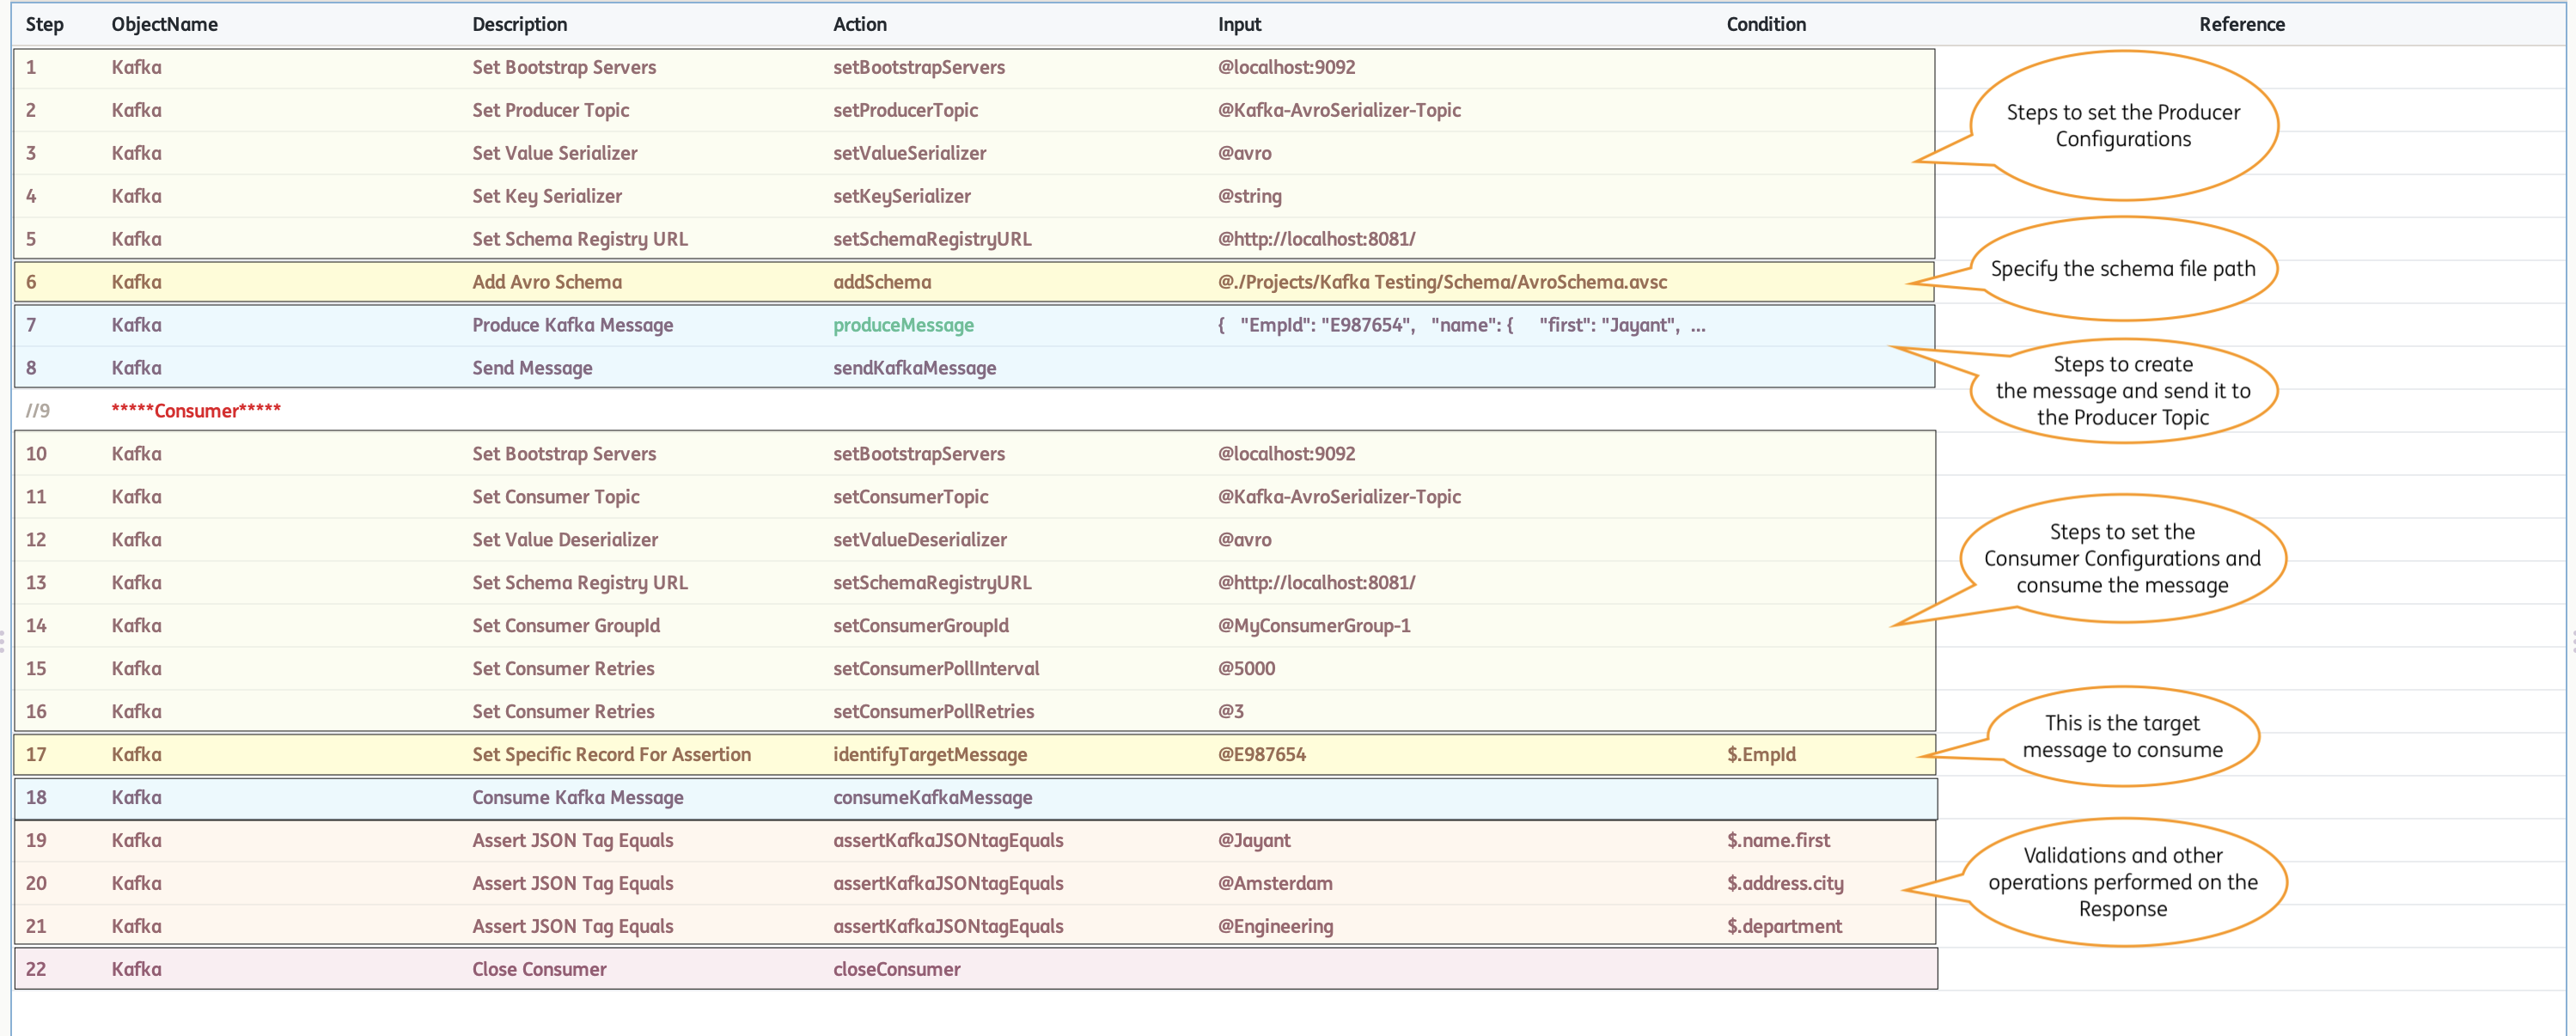
For Avro Serializer, the following are required: bootstrap.servers, producer.topic, value.serializer, key.serializer, schema.registry.url, addSchema
Legacy
Kafka connectivity is configured per test step — the producer and consumer settings are set up directly as steps before producing or consuming a message.
1. Configure the producer
- Set up the configurations for the
Kafka Producer. For instance setting theserver,producerTopic,keySerializer,valueSerializer,partition,headersetc. are required.
2. Produce a message
-
Create the
message. You can leverage built-in capabilities in INGenious likeSynthetic Data Generationto createUUIDs and other data to be fed into the message. -
Use the
produceMessageaction, which comes with an editor that makes parameterization of data in the paylod very easy. This action is always marked in Green.. [See the section below] -
Use the
sendKafkaMessageaction to push the message to the producer topic.
3. Configure the consumer
- Set up the configurations for the
Kafka Consumer. For instance setting theconsumerGroupId,consumerTopic,valueDeserializer,pollIntervalsetc. are required.
4. Consume a message
-
Use the
identifyTargetMessageaction to consume a specific target message, and provide a unique value along with its corresponding JSON Path or X-Path. -
Consume the message and validate/store message details, specific tags or even the entire message body.
For String Serializer, the following are required: server, producerTopic, valueSerializer, keySerializer
For Avro Serializer, the following are required: server, producerTopic, valueSerializer, keySerializer, setSchemaRegistryURL, addSchema
Kafka Configurations
4.0.0
Open the gear icon  Settings Kafka Configurations.
This single tab replaces the legacy Kafka SSL Configurations tab and hosts two sides:
- Producers — one config per producer alias (e.g.
OrdersProducer) - Consumers — one config per consumer alias (e.g.
OrdersConsumer)
Each side has a dropdown to select an existing alias, plus New, Delete and Test Connection
buttons. A default alias is created automatically the first time the project is opened.
Configuration fields are grouped into collapsible sections:
| Group | Producer fields | Consumer fields |
|---|---|---|
| General | producer.alias |
consumer.alias |
| Connection | bootstrap.servers, producer.topic, partition |
bootstrap.servers, consumer.topic, group.id |
| Serialization | key.serializer, value.serializer |
value.deserializer |
| Polling | — | poll.retries, poll.interval.ms, max.poll.records |
| Schema Registry | schema.registry.url, auto.register.schemas, shared.secret |
schema.registry.url, shared.secret |
| SSL | ssl.enabled, truststore/keystore location, password, type, ssl.key.password |
same |
key.serializer / value.serializer (and value.deserializer) accept short aliases which are
resolved to the underlying class:
| Alias | Resolves to |
|---|---|
string |
StringSerializer / StringDeserializer |
bytearray |
ByteArraySerializer / ByteArrayDeserializer |
avro |
Confluent KafkaAvroSerializer / KafkaAvroDeserializer (requires schema.registry.url) |
| (anything else) | Treated as a fully-qualified class name |
SSL and Schema Registry
- Set
ssl.enabled=trueon the alias to enable one-way or mutual TLS; keystore/truststore fields are only required for the auth mode you use. - Set
schema.registry.urlwhen usingavro auto.register.schemas(producer only) controls whether new Avro schemas are auto-registered with the schema registry.
Test Connection
Use Test Connection to validate bootstrap.servers (and, if set, that the configured
topic exists) without producing or consuming a real message.
Legacy
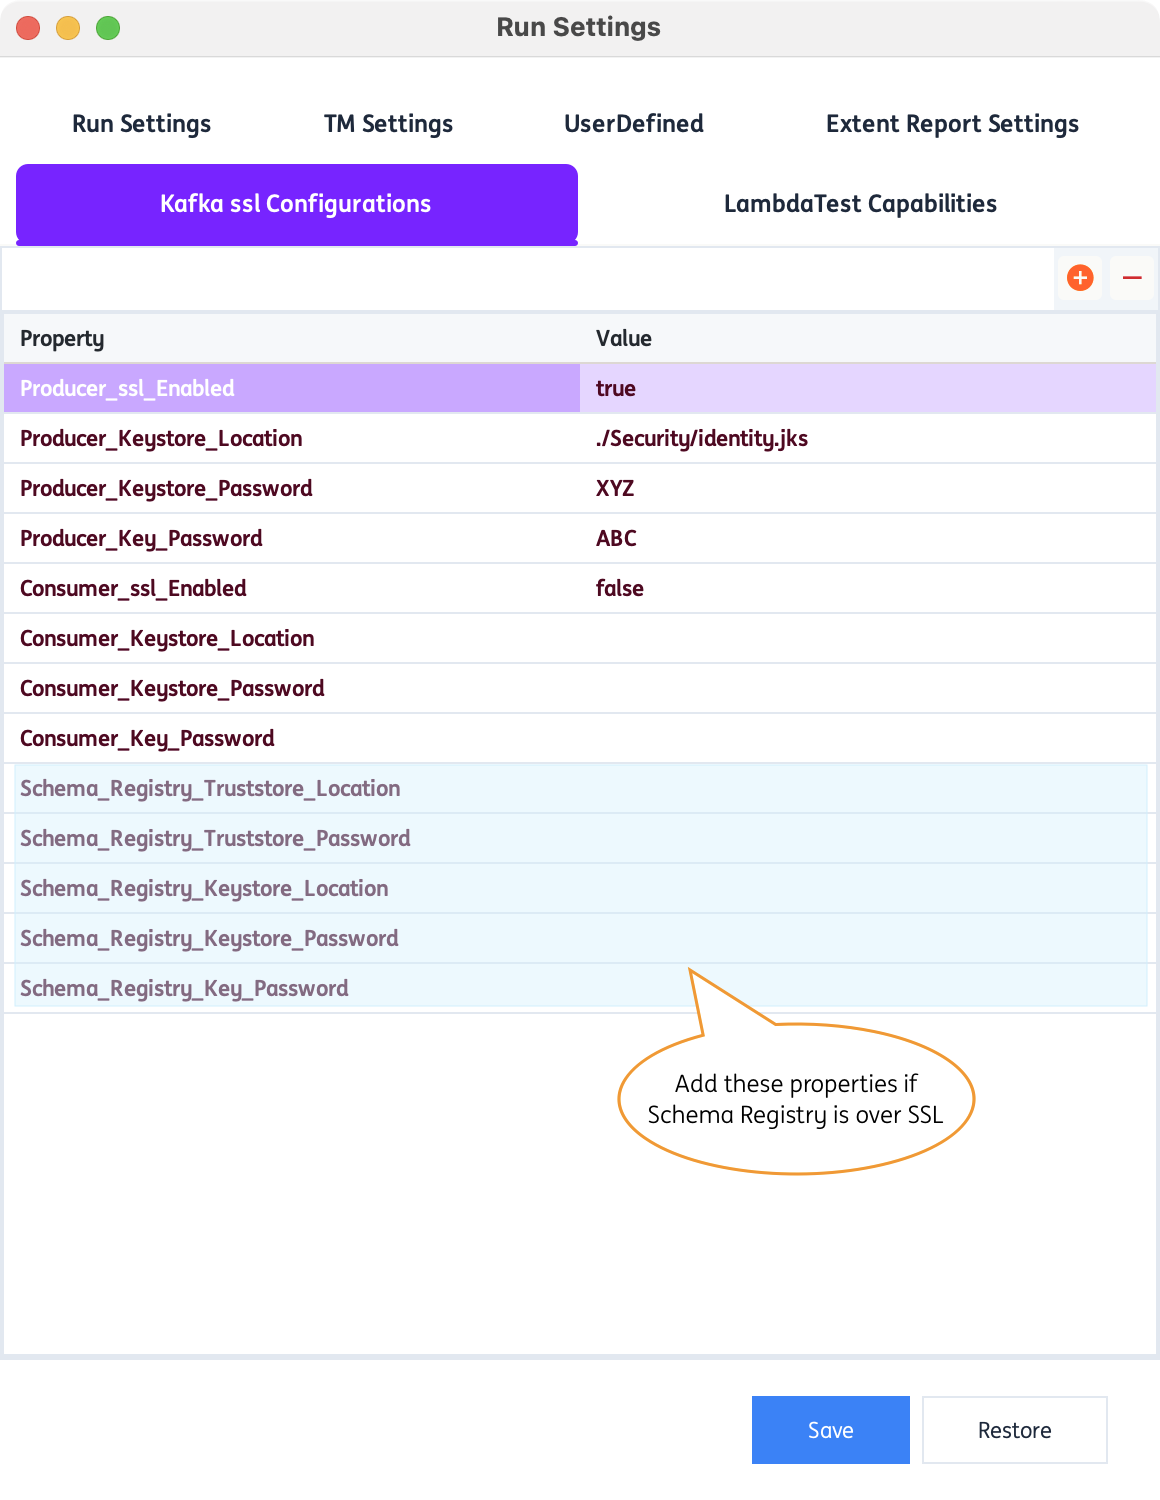
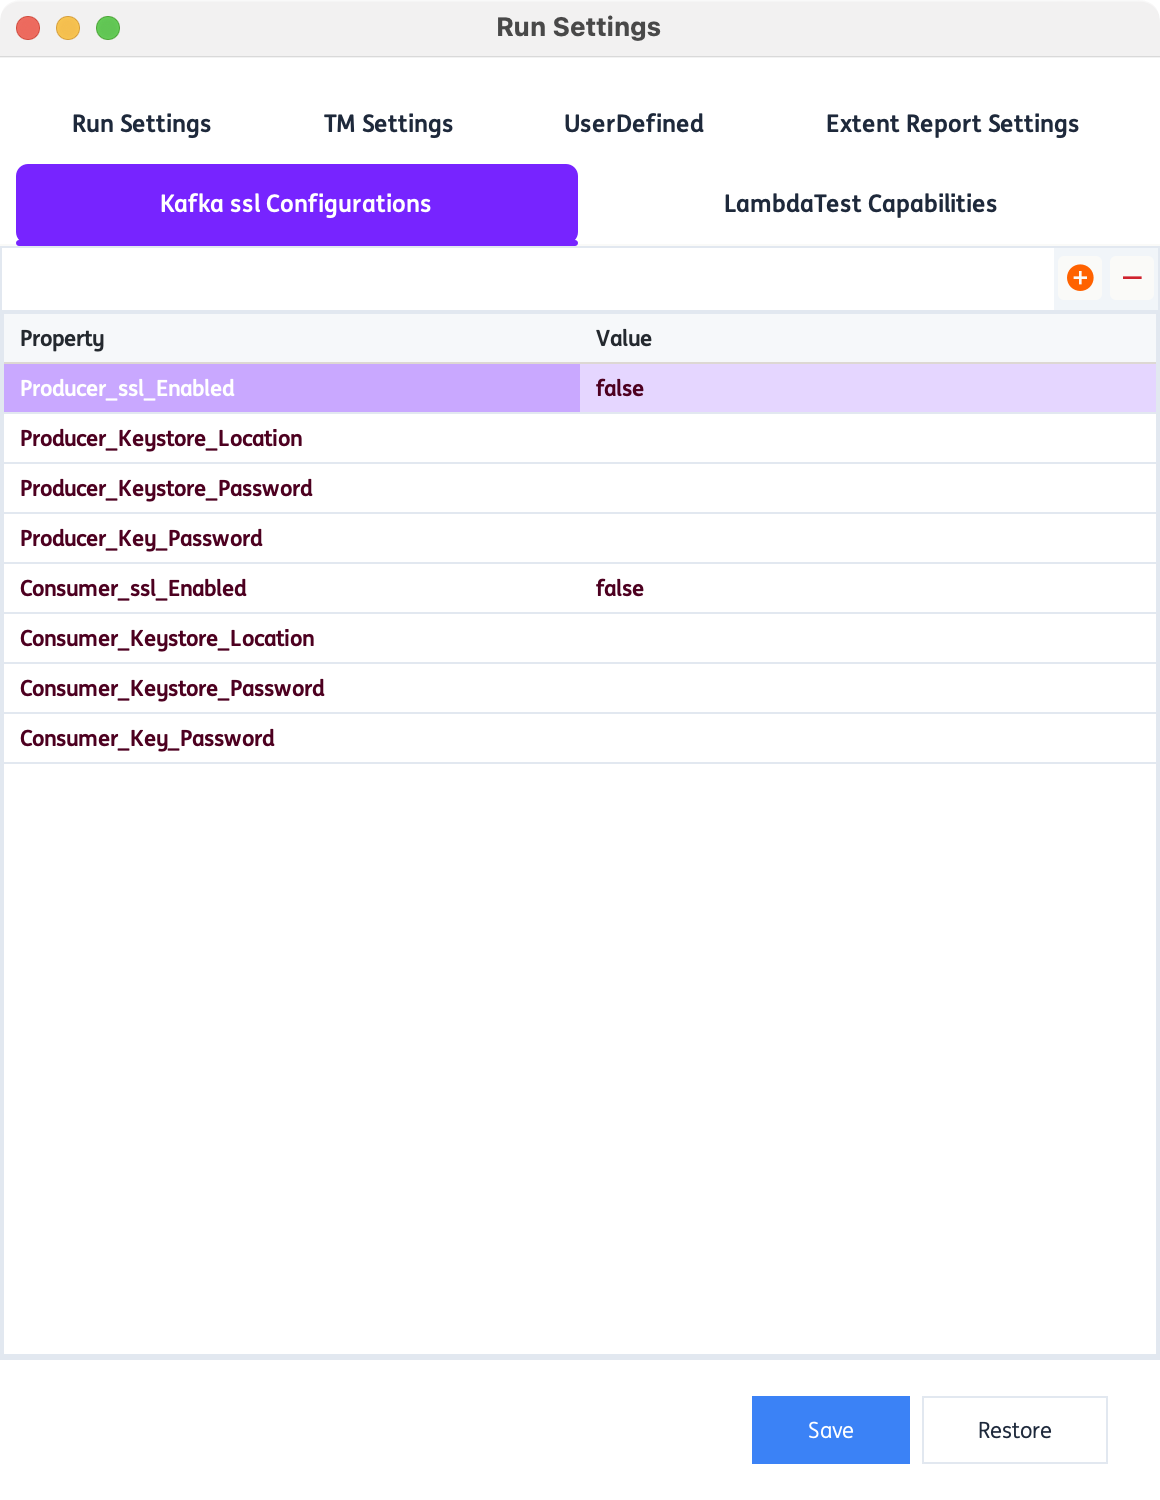
If Key Store Certificates are required, you may set it up by clicking on the gear icon to open up the Run Settings Kakfa ssl Configurations
For this example, Producer_ssl_Enabled is set to true then the following are required: Producer_Keystore_Location, Producer_Key_Password, Producer_Keystore_Password
For this example, Producer_ssl_Enabled is set to false
Payload Data Parameterization
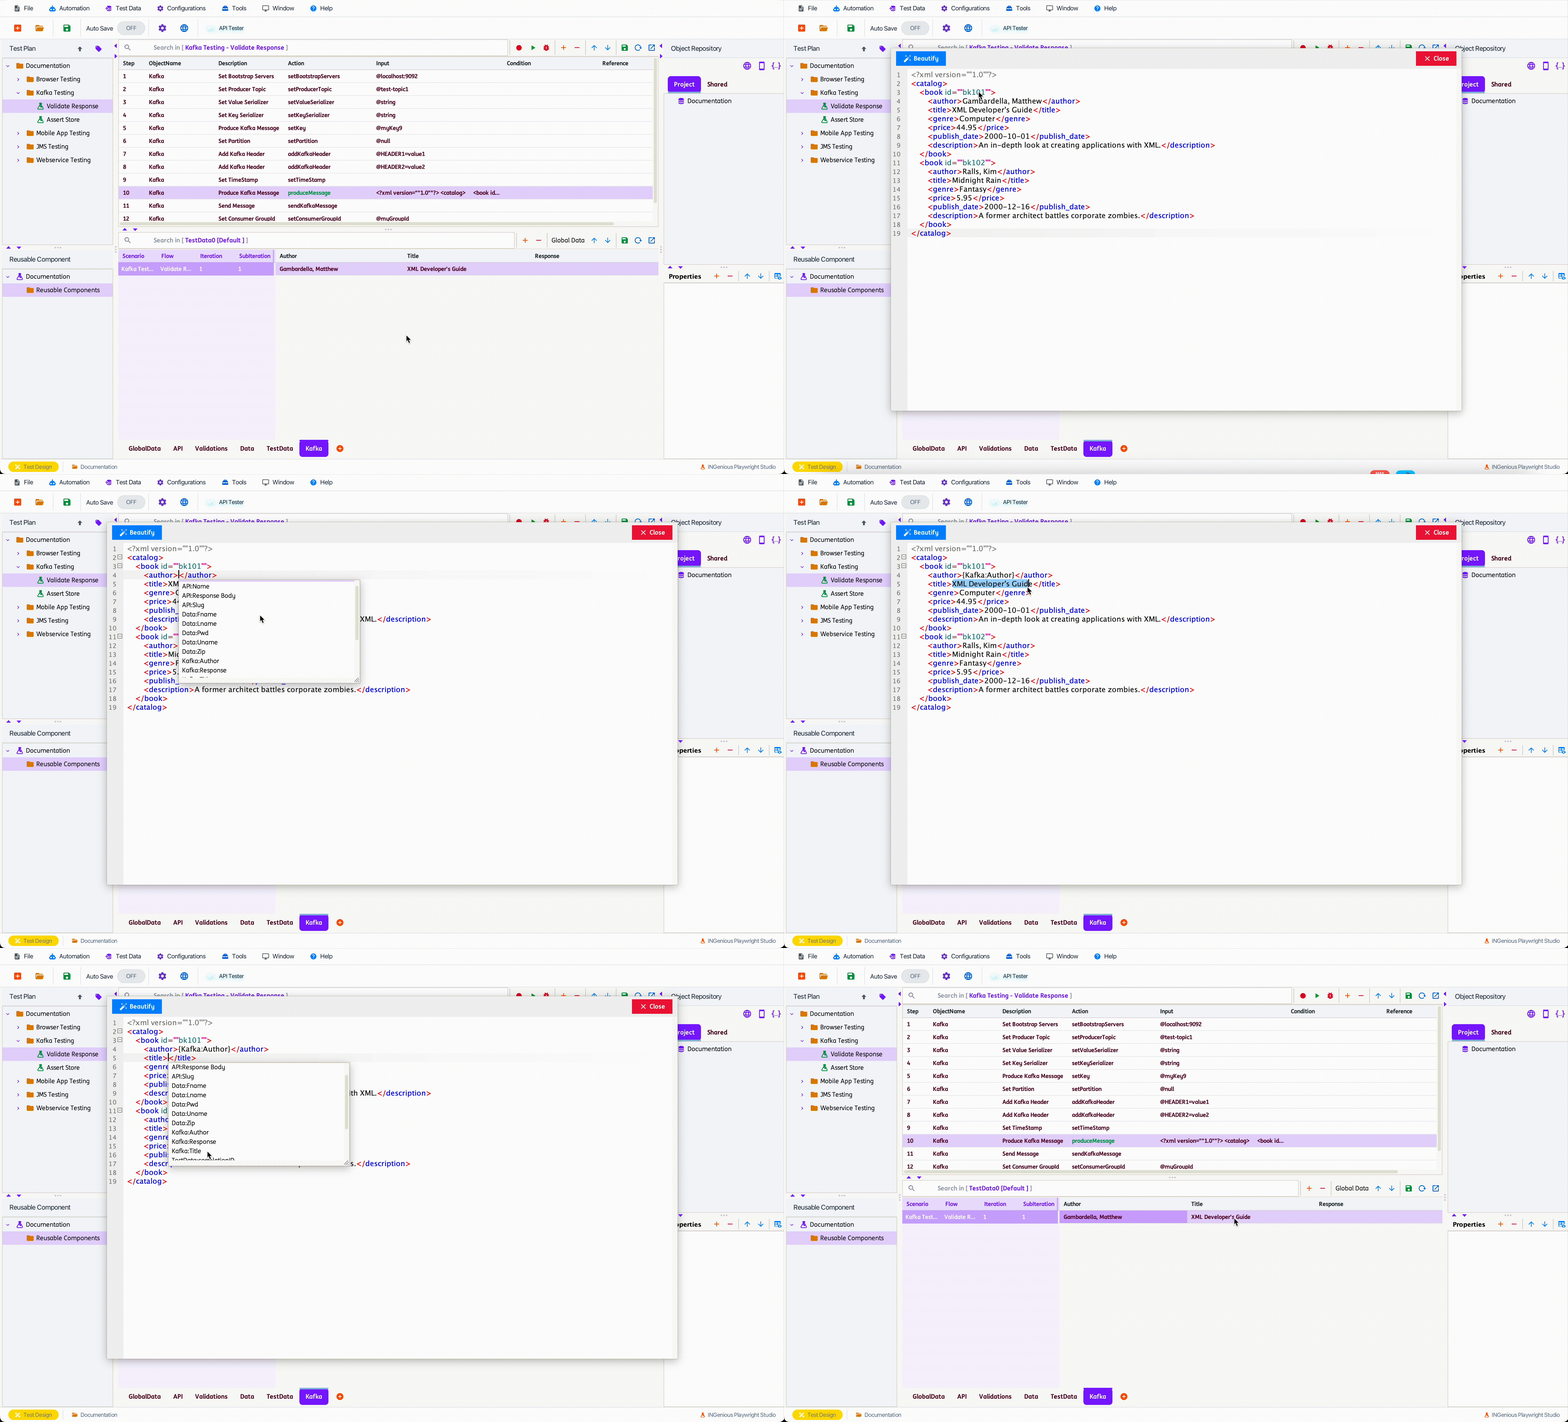
Data Parameterization can be done using the built-in editor. If you mouse-hover on the Input column, corresponding to the produceMessage step, an option to open up the Editor comes up.
Inside this editor, we can paste the entire Payload and then parameterize the specific JSON/XML tags based on our needs.
If we press Ctrl+Space the list of all available DataSheets : ColumnNames along with all user-defined variables show up. We can then select the appropriate item from where we want to parameterize.
We need to press Esc to close the editor
Assert/Store Response Tags
We can access the Response Tags using xpath for XMLs and jsonPath for JSONs.
The corresponding xpath or jsonPath for the tag, should be entered in the Condition column like as shown below :

Example for writing Xpath
<root xmlns:foo="http://www.foo.org/" xmlns:bar="http://www.bar.org">
    <actors>
        <actor id="1">Christian Bale</actor>
        <actor id="2">Liam Neeson</actor>
        <actor id="3">Michael Caine</actor>
    </actors>
</root>
XPath for retrieving Liam Neeson is /root/actors/actor[2]/text() or simply //actor[2]/text()
Example for writing JSONPath
Example 1 :
JSON Path for retrieving TestName is $.name
Example 2 :
{
    "page": 2,
    "per_page": 6,
    "total": 12,
    "total_pages": 2,
    "data": [
        {
            "id": 7,
            "email": "michael.lawson@xyz.com",
            "first_name": "Michael",
            "last_name": "Lawson"
        },
        {
            "id": 8,
            "email": "lindsay.ferguson@xyz.com",
            "first_name": "Lindsay",
            "last_name": "Ferguson"
        },
        {
            "id": 9,
            "email": "tobias.funke@xyz.com",
            "first_name": "Tobias",
            "last_name": "Funke"
        },
        {
            "id": 10,
            "email": "byron.fields@xyz.com",
            "first_name": "Byron",
            "last_name": "Fields"
        },
        {
            "id": 11,
            "email": "george.edwards@xyz.com",
            "first_name": "George",
            "last_name": "Edwards"
        },
        {
            "id": 12,
            "email": "rachel.howell@xyz.com",
            "first_name": "Rachel",
            "last_name": "Howell"
        }
    ],
    "additional": {
        "url": "https://xyz.com",
        "text": "Happy Testing!"
    }
}
JSON Path for retrieving byron.fields@ing.com is $.data[3].email [Index starts with 0]
To learn more about JSONPath, visit this GitHub page.
To learn more about XPath, visit the XPath Syntax page.